How to Make a Homemade Tent for Camping | True Guide
Planning a camping trip but don’t have a tent? Or maybe you want to save money and enjoy the satisfaction of building your own shelter?
You’re in the right place. Learning how to make a homemade tent for camping can turn your outdoor experience from ordinary to unforgettable. Imagine having a sturdy, weatherproof tent that you crafted yourself, customized to fit your style and needs. This guide will walk you through simple steps and materials that you can find easily, so you’re ready to set up camp anywhere.
Keep reading, and you’ll discover how to create a cozy, reliable tent that makes your next adventure both comfortable and exciting.
Quick Tarp A-frame
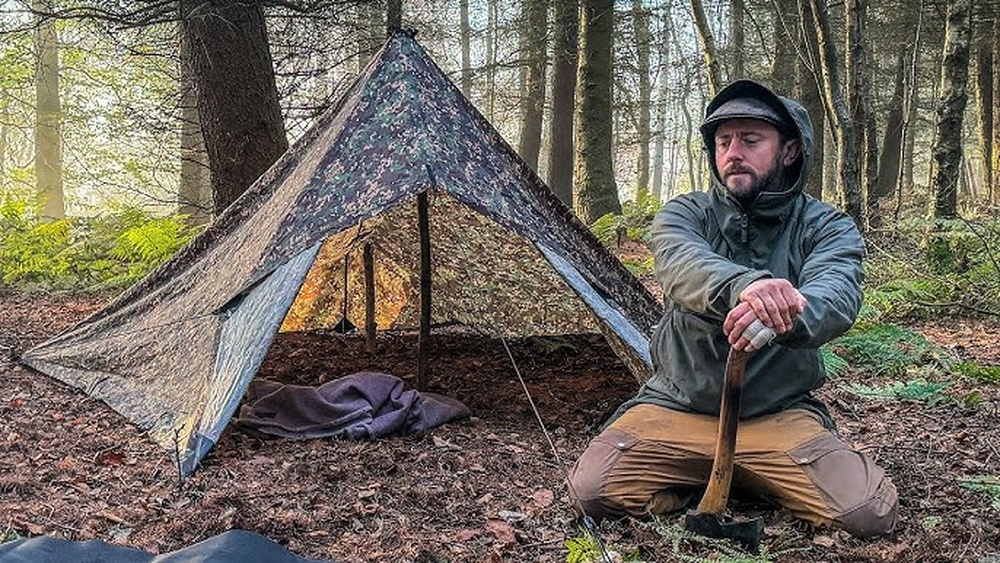
The Quick Tarp A-Frame offers a fast, simple shelter for camping. It uses minimal gear and sets up easily. This design provides good rain protection and airflow. Great for beginners and light packers alike.
What You Need
- One waterproof tarp, about 8×10 feet
- Two adjustable hiking poles or sturdy sticks
- Paracord or strong rope, 12-15 feet
- Four tent stakes or heavy rocks
- Optional: hammer or mallet to drive stakes
Step-by-step Setup
- Find a flat, dry spot between two trees about 6-8 feet apart.
- Tie the paracord tightly between the trees at waist height.
- Drape the tarp evenly over the ridgeline rope.
- Place hiking poles under the tarp ends to form the A-frame.
- Pull each tarp corner outward and stake it firmly to the ground.
- Adjust the ridgeline and stakes for a tight, stable shelter.
- Check for gaps and reposition stakes if needed to block wind.
Diy Canvas Wall Tent
Building a DIY canvas wall tent offers a solid, durable shelter for camping trips. Canvas tents provide excellent protection from wind and rain. They also breathe well, keeping the inside comfortable in various weather conditions.
This type of tent requires some effort and basic sewing skills. The result is a spacious and sturdy shelter that lasts for many camping seasons. Follow the simple steps below to create your own canvas wall tent.
What You Need
- Heavy-duty canvas fabric (waterproof or treated)
- Strong thread and heavy-duty sewing needles
- Measuring tape and fabric chalk
- Scissors or rotary cutter
- Metal grommets and grommet tool
- Rope or paracord for guy lines
- Wooden or metal tent poles
- Hammer and stakes
- Sewing machine (optional but recommended)
Step-by-step Construction
- Measure and cut the canvas into panels for the walls and roof.
- Sew the side panels together with strong, double-stitched seams.
- Attach the roof panel securely to the wall panels.
- Reinforce corners with extra canvas patches and stitching.
- Install metal grommets along the bottom edge for staking.
- Create door flaps by cutting and hemming an opening on one wall panel.
- Set up tent poles inside the tent to support the roof.
- Stake the tent corners and use guy lines for extra stability.
Adding Custom Features
- Install mesh windows with flaps for ventilation and insect protection.
- Add an interior gear loft or pockets for storage.
- Sew in a groundsheet or floor to keep moisture out.
- Use waterproof spray or wax to enhance canvas water resistance.
- Include extra guy lines for windy conditions.
- Personalize with colors or patches for easy identification.
Waterproofing Tips
Waterproofing your homemade tent protects you from rain and moisture. It keeps the inside dry and comfortable. Good waterproofing also extends your tent’s life. Use simple and effective methods to shield your tent from water.
Choose The Right Waterproof Fabric
Start with a fabric that resists water well. Canvas or nylon coated with waterproofing works best. Avoid untreated fabrics that absorb water quickly. Select materials with a waterproof rating for better protection.
Apply Waterproof Sealant
Use waterproof sprays or sealants on your tent fabric. Spread it evenly to cover all surfaces. Allow it to dry fully before using the tent. Reapply sealant every season or after heavy rain to maintain protection.
Seal The Seams Carefully
Seams can leak if left untreated. Apply seam sealer to all stitched areas. Use a small brush to cover threads and fabric edges. This blocks water from seeping through stitches and keeps your tent dry.
Add A Groundsheet Or Footprint
Place a waterproof groundsheet under your tent floor. It stops water from soaking up from the ground. Use a footprint that matches your tent’s size. This extra layer protects your tent floor and improves comfort.
Design A Rainfly For Extra Protection
A rainfly covers your tent’s top and sides. It sheds rain before it reaches the tent fabric. Use lightweight, waterproof material for the rainfly. Secure it tightly to prevent water pooling during storms.
Essential Tools And Materials
Building a homemade tent starts with gathering the right tools and materials. These essentials shape the tent’s strength and comfort. Choosing quality items ensures your tent stays safe and dry.
Focus on materials that are lightweight yet durable. Tools should be simple to use, even for beginners. Prepare everything before you head outdoors to save time and avoid hassle.
Fabric Choices For Tent Walls
Select a fabric that resists water and wind. Canvas is strong and breathable but can be heavy. Polyester and nylon are lighter and dry fast. Pick a color that blends well with nature or stands out for visibility.
Support Poles And Framework
Use sturdy poles made of aluminum or fiberglass. These hold the tent upright and withstand wind. Adjustable hiking poles work well for small tents. For larger tents, wooden sticks from the campsite are an option.
Ropes And Stakes
Strong ropes secure the tent to trees or poles. Paracord is ideal due to its strength and flexibility. Stakes anchor the tent to the ground. Metal stakes last longer and hold better than plastic ones.
Tools For Assembly
Carry a hammer or mallet to drive stakes into the ground. Scissors or a knife helps cut ropes and fabric. Sewing kits or fabric glue repair small tears. Measuring tape ensures precise cutting and setup.
Additional Waterproofing Supplies
Waterproof sprays or seam sealants protect the tent from rain. Tarp or groundsheet adds extra protection beneath the tent. These prevent moisture from seeping inside, keeping the interior dry and comfortable.
Choosing The Right Location
Picking the best spot for your homemade tent is key for a good camping trip. A good location keeps you safe and comfortable. It also helps protect your tent and gear from damage.
Look for a flat area. Uneven ground makes sleeping hard and can cause water to pool under your tent. A flat spot also helps your tent stay stable during wind or rain.
Check For Level Ground
Find a place with flat, even ground. This stops your tent from tipping or sliding. It makes sleeping more comfortable too. Avoid hills or slopes because water runs downhill and can flood your tent.
Avoid Low-lying Areas
Low spots collect water during rain. Your tent can flood if you camp there. Choose higher ground to stay dry. Watch out for natural dips or holes in the terrain.
Look For Natural Wind Breaks
Wind can make your tent shaky and cold. Trees, bushes, or rocks can block wind and protect your tent. Place your tent near these natural barriers but not too close to large trees that might drop branches.
Consider Sunlight And Shade
Morning sun helps dry your tent and warms you up. Afternoon shade keeps it cool during hot days. Find a spot with a good balance of sun and shade for comfort.
Check For Hazards
Stay clear of dead trees, loose rocks, or animal trails. These can be dangerous during your stay. Look around carefully before setting up your tent to avoid risks.
Tent Frame Options
Choosing the right frame is key to a sturdy homemade tent. The frame holds your tent up and shapes it. Different materials offer unique benefits. Some are light and easy to carry. Others provide strong support for rough weather. Consider your camping style and what you have on hand.
Using Hiking Poles Or Sticks
Hiking poles make excellent tent supports. They are lightweight and adjustable. You can set the poles at different heights. This helps create a stable and tall frame.
Find sturdy sticks if you do not have hiking poles. Look for straight, strong branches about 5 to 6 feet long. Make sure the wood is dry and not brittle. You can use rope or cord to tie the sticks together.
This option is perfect for quick, simple tents. It requires no extra tools or materials. Hiking poles and sticks work well for small, personal shelters.
Building With Pvc Or Wood
PVC pipes are popular for building homemade tent frames. They are light, cheap, and easy to cut. You can connect pipes with fittings to form different shapes.
Wood offers a more solid frame. Use smooth, straight wooden poles or dowels. Wood frames can handle heavier fabrics and strong winds.
Both PVC and wood need tools like a saw and drill. Plan your design carefully before cutting. Secure joints with screws or strong glue. This frame option suits campers wanting durable, reusable tents.
Sewing And Assembly Techniques
Sewing and assembly form the heart of building a homemade tent. Careful stitching and solid connections keep the tent strong and weatherproof. These techniques help turn fabric panels into a durable shelter that can withstand wind and rain.
Understanding how to prepare fabric and install grommets ensures your tent holds up well outdoors. Following clear steps leads to a neat, functional tent that feels safe and comfortable.
Preparing Fabric Panels
Cut fabric panels to the tent’s exact measurements. Use a fabric marker and ruler for straight lines. Leave extra fabric around edges for seams and hems.
Iron the fabric to remove wrinkles. Flat panels make sewing easier and more accurate. Organize panels by shape and size before stitching.
Reinforce corners and stress points with extra fabric layers. This adds strength where the tent will face the most tension. Double-check panel alignment before moving to sewing.
Installing Grommets And Seams
Mark grommet locations evenly along edges where ropes or stakes will attach. Punch holes carefully to avoid tearing the fabric. Use a grommet kit to press metal rings firmly into place.
Sew seams with a strong, weather-resistant thread. Use a straight stitch with small stitches for durability. Reinforce seams with a second stitch or fabric tape inside.
Seal seams with waterproof tape or seam sealer. This prevents leaks during rain. Trim extra threads and fabric to avoid snags.
Test grommets by pulling gently on them. Sewn seams should feel tight and secure without puckering. Proper assembly protects your tent from outdoor elements.
Credit: www.battlbox.com
Setting Up Your Tent Outdoors
Setting up your homemade tent outdoors requires attention to detail. Proper setup ensures stability and comfort during camping. Follow simple steps to secure your tent against wind and rain. Focus on tying ridgelines and staking the tent firmly to the ground.
Tying Ridgelines
Start by choosing two strong anchor points, like trees or poles. Tie a ridgeline between them at chest height. Use a bowline knot on one end to create a secure loop. On the other end, use a taut-line hitch to adjust tension easily. Make sure the ridgeline is tight to keep the tent stable.
Place your tarp or tent fabric evenly over the ridgeline. This creates the basic shape of your tent. Adjust the ridgeline tension if the fabric sags or feels loose. A well-tied ridgeline holds the tent fabric firmly and keeps it from collapsing.
Staking And Securing
Stake each corner of your tent by pulling the fabric tight and driving stakes into the ground. Angle the stakes away from the tent for better hold. Use strong, durable stakes suitable for the soil type at your campsite.
Check the tent’s sides and corners. Add extra stakes or guy lines if needed to prevent flapping. Secure all loose ends to avoid noise and wear from wind. Proper staking protects the tent from shifting or blowing away.
Test the tent’s stability by gently pushing on the frame and fabric. Tighten any slack in ridgelines or stakes. A solid setup keeps you dry and comfortable throughout your outdoor adventure.
Testing For Waterproofing
Testing for waterproofing is a crucial step in making a homemade tent. Ensuring your tent keeps water out protects you from rain and moisture. A tent that is not waterproof can make your camping experience uncomfortable and unsafe.
This section explains simple ways to check if your tent is waterproof. You learn how to spot weak spots and fix them before your trip. Testing early saves time and effort later.
Visual Inspection For Waterproofing
Start by examining your tent’s fabric closely. Look for holes, tears, or thin spots. Check the seams carefully, as they are common leak points. Use a bright light behind the fabric to see any weak areas. Fix any damage before moving to water tests.
Spray Test With Water
Use a spray bottle filled with water to mimic rain. Spray all parts of the tent, focusing on seams and corners. Watch for water soaking through or dripping inside. If water passes through, apply more waterproof sealant. Repeat the test until no water leaks.
Flood Test On The Ground
Set up your tent outside on dry ground. Pour water gently around the base and on the roof. Check the inside for any water spots or dampness. This test shows if your tent’s floor and roof stop water well. Use waterproof tarps or sealants to fix leaks.
Seam Sealing Check
Seams often let water inside tents. Apply seam sealer along all stitched lines. After drying, spray water on seams again. Look inside for any damp areas. Reapply sealer if needed. This step is key for strong waterproof protection.
Credit: www.youtube.com
Adding Doors And Ventilation
Adding doors and ventilation to your homemade tent improves comfort and usability. Doors provide easy access and privacy. Ventilation helps air flow inside, reducing heat and moisture buildup.
Properly designed doors allow you to enter and exit without difficulty. Ventilation prevents stuffiness and keeps the tent dry. Both features make your camping experience more pleasant.
Creating A Simple Door Flap
Cut a rectangular flap on one side of the tent fabric. Leave one edge attached to act as a hinge. Use Velcro strips or buttons to secure the flap when closed. This setup keeps bugs out and lets you open the door easily.
Adding Mesh For Ventilation
Attach mesh fabric over a window cutout in the tent wall. This lets fresh air in but blocks insects. Sew or glue the mesh firmly to avoid gaps. Position mesh panels opposite to the door for cross ventilation.
Installing Tie-backs For Door And Vents
Fix tie-back straps near the door and mesh openings. Use these to hold flaps open during warm weather. They allow you to control airflow and keep the tent cooler. Tie-backs are simple but effective additions.
Camping Comfort With Homemade Tents
Camping comfort improves greatly with a homemade tent. These tents offer a cozy shelter tailored to your needs. You control the size, shape, and materials. This makes camping more enjoyable and personal.
Homemade tents also provide a sense of pride and accomplishment. They create a connection to nature through hands-on building. Plus, they can be more affordable than store-bought tents. Comfort does not require expensive gear.
Choosing The Right Materials
Start with materials that are durable and weather-resistant. Canvas and tarps work well to keep out rain and wind. Look for fabrics that breathe to reduce condensation inside. Lightweight materials make the tent easier to carry.
Setting Up For Stability
Find a flat, dry spot to pitch your tent. Use strong poles or sturdy sticks to support the frame. Secure the tent with stakes to hold it tight in the wind. A stable tent keeps you comfortable and safe all night.
Adding Comfort Features
Include a groundsheet or tarp under the tent floor. It blocks moisture and adds insulation from cold ground. Use blankets or foam mats for a soft sleeping surface. Small touches like a mesh door keep bugs out and air flowing.
Credit: themerrythought.com
Conclusion
Making a homemade tent for camping is simple and rewarding. Use basic materials like tarps, poles, and ropes. Follow clear steps to build a sturdy shelter. This tent keeps you dry and protected outdoors. Enjoy nature while saving money and learning new skills.
Remember, practice makes perfect, try building your tent before your trip. Camping feels better with a shelter you made yourself. Keep your setup safe and secure for a great adventure. Your homemade tent will be a reliable companion on many trips.

I am an outdoor enthusiast and gear researcher passionate about camping, hiking, backpacking, and outdoor adventures. I enjoy testing gear, comparing products, and sharing practical advice to help readers make informed decisions. At BestOutsideGear, I create honest gear reviews, buying guides, and outdoor tips to help adventurers choose the right equipment with confidence.