How to Make a Hanging Tent for Camping | Step-by-Step Tips
Imagine camping high above the ground, away from bugs, damp soil, and uneven terrain. A hanging tent can make that dream come true.
If you’ve ever wondered how to combine the comfort of a hammock with the protection of a tent, you’re in the right place. In this guide, you’ll learn step-by-step how to make your own hanging tent for camping. Whether you’re a seasoned camper or just starting out, this DIY project will add a whole new level of adventure and comfort to your outdoor experience.
Ready to elevate your camping game? Let’s dive in and build your perfect hanging tent!
Choosing Materials
Choosing the right materials is key to building a safe and comfortable hanging tent. The materials must be strong, lightweight, and weather-resistant. Picking the best fabric and hardware ensures your tent holds up well outdoors. It also makes setup easier and safer.
Selecting Durable Fabrics
Choose fabrics that resist tearing and wear. Ripstop nylon and polyester are common choices. They are lightweight but strong enough to support weight. Look for fabrics with water-resistant coatings to keep dry during rain. Breathable fabrics help reduce condensation inside the tent. Darker colors block sunlight better but may absorb heat. Light colors reflect heat but show dirt more easily.
Necessary Hardware And Tools
Strong ropes or straps are essential for hanging the tent securely. Use climbing-grade ropes for safety and durability. Lightweight metal carabiners connect ropes to tent loops. Ratchet straps help tighten the tent for stability. Sewing needles, heavy-duty thread, and scissors are needed to assemble the fabric pieces. A measuring tape ensures precise cuts and fits. Having a sturdy tarp can add extra weather protection above the tent.
Designing Your Tent
Designing a hanging tent starts with choosing the right shape. The shape affects comfort, stability, and ease of use. A good design keeps you safe and dry while you enjoy camping.
Think about where you will hang the tent. Trees or sturdy poles work best. The tent must fit well between suspension points. This keeps it balanced and secure.
Basic Tent Shapes
Simple shapes make setup easier. Rectangular and triangular shapes are common. Rectangular tents offer more space inside. Triangular tents are lighter and more stable.
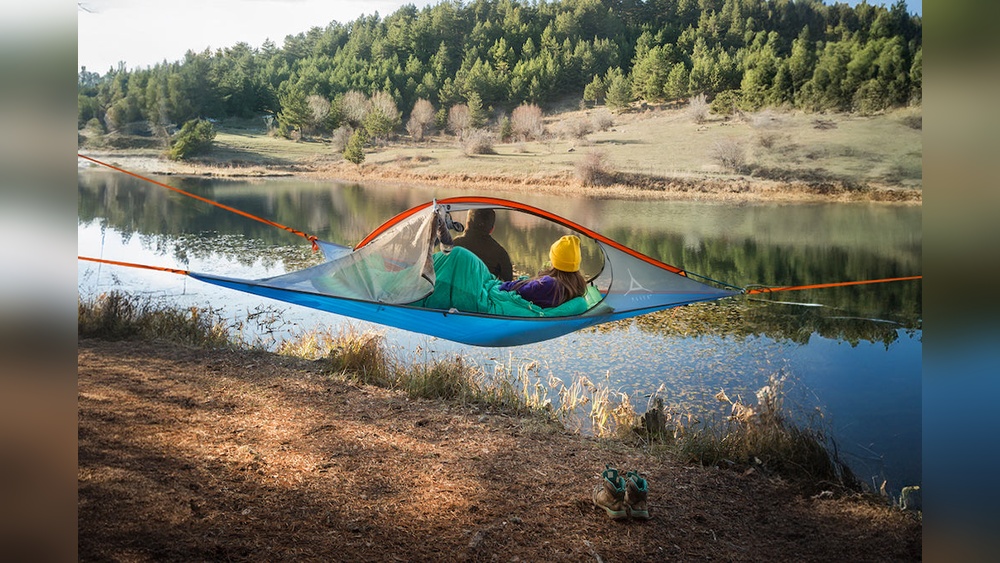
Consider a hammock-style tent for comfort. It cradles your body and keeps you off the ground. Another option is a box shape for extra room.
Incorporating Suspension Points
Suspension points hold the tent in the air. Choose strong trees or poles about 10 to 15 feet apart. Use heavy-duty straps or ropes to avoid damage.
Attach suspension points evenly to keep the tent flat. Avoid sharp angles that stress the fabric. Test the tension to ensure safety before use.
Preparing The Site
Preparing the site is the first step in making a hanging tent for camping. It ensures safety and comfort during your outdoor stay. A well-chosen location supports the tent securely and protects you from hazards. Careful preparation helps avoid damage to trees and the environment.
Finding Suitable Trees
Choose trees that are strong and healthy. The trunks should be thick enough to hold your weight and the tent. Look for trees that are about 12 to 15 feet apart. Avoid trees with dead branches or signs of disease. Pick trees with bark that won’t easily peel or crack. Check the ground around the trees for stability and flatness. Make sure the area is clear of rocks, roots, and sharp objects.
Measuring And Marking
Measure the distance between the trees carefully. Use a tape measure or rope for accuracy. Mark the spots where you will attach the tent straps or ropes. The marks should be at a height that keeps the tent off the ground. Mark equal heights on both trees to keep the tent balanced. Double-check your measurements before tying any ropes. Proper measuring prevents sagging and ensures a secure setup.

Credit: www.tentsile.com
Constructing The Tent Body
Constructing the tent body is a key step in making your hanging tent. This part forms the shelter that will keep you safe and dry. Strong fabric and careful assembly create a durable tent body.
Start with quality fabric that can resist tears and water. The shape should fit comfortably between trees and allow for good airflow. Precise cutting and sewing ensure the tent holds its form.
Cutting And Sewing Fabric
Choose a lightweight, waterproof fabric like ripstop nylon. Use a measuring tape to mark out panels for the tent body. Cut the fabric with sharp scissors on a flat surface.
Sew panels together using a strong stitch, such as a double stitch. Keep seams straight and tight to avoid gaps. Leave openings for doors and ventilation.
Use a sewing machine for the best results. Hand sewing can work but takes more time and may be less durable. Finish edges with bias tape to prevent fraying.
Adding Reinforcements
Reinforce stress points where ropes or straps will attach. Sew extra fabric patches or webbing strips on these areas. This stops tearing under tension.
Use heavy-duty thread and bar tack stitches to secure reinforcements. Add grommets or metal rings for easy rope attachment. Place them evenly to balance the tent’s weight.
Check all reinforcements for strength before hanging the tent. Proper support extends the tent’s life and improves safety during use.
Building The Suspension System
Building the suspension system is a vital step in creating your hanging tent. It holds the entire structure safely above the ground. Strong, reliable suspension prevents accidents and ensures a comfortable camping experience.
This system must support your weight and stay stable in different weather conditions. Choosing the right materials and learning proper techniques will make your hanging tent sturdy and secure.
Choosing Strong Ropes And Straps
Select ropes and straps that can hold heavy loads without breaking. Look for materials like nylon or polyester, known for durability and strength. Avoid thin or worn-out ropes that may snap under pressure.
Use wide, flat straps instead of round ropes to reduce damage to tree bark. Straps with a breaking strength of at least 1,000 pounds provide extra safety. Make sure the length fits the distance between your hanging points.
Mastering Essential Knots
Knots secure your ropes and straps, keeping your tent in place. Learn simple, strong knots like the bowline and the double fisherman’s knot. These knots hold tight under tension and are easy to untie later.
Practice tying knots before camping to build confidence. A well-tied knot reduces slipping and prevents the tent from falling. Avoid complex knots that may come loose or are hard to adjust.
Credit: www.ezup.com
Assembling The Tent
Assembling your hanging tent carefully ensures a safe and comfortable camping experience. This step involves securing the tent to strong supports and making sure it is stable. Proper assembly keeps the tent steady and protects you from falls or damage during use.
Attaching Tent To Suspension
Begin by selecting two sturdy trees or poles to hang your tent. Use strong ropes or straps to connect the tent’s corners to these supports. Secure the ropes with reliable knots like the bowline or figure-eight. Check all attachment points to confirm they hold tight without slipping. This connection forms the base of your hanging tent.
Adjusting Tension And Stability
After hanging, adjust the ropes to balance the tent evenly. Tighten or loosen each side to remove sagging and create a flat surface. Test the tent by applying light pressure to ensure it stays firm. Add extra knots or supports if needed to improve stability. Proper tension prevents swinging and keeps you safe while inside the tent.
Adding Weather Protection
Adding weather protection to your hanging tent is crucial for a comfortable camping experience. It shields you from rain, wind, and pesky insects. Proper protection keeps you dry and safe throughout the night. Let’s explore two key elements to enhance your tent’s weather resistance.
Installing Rainfly
A rainfly is a waterproof cover placed over your tent. It stops rain from soaking your tent fabric. Choose a rainfly that fits your tent’s size and shape. Attach it tightly to avoid flapping in the wind. Make sure the rainfly extends beyond the tent’s edges. This creates a good runoff path for rainwater. Secure the rainfly with ropes or clips to nearby trees or poles. This setup helps keep your hanging tent dry and cozy.
Adding Mosquito Netting
Mosquito netting protects you from bugs and small insects. It lets fresh air in while keeping pests out. Use fine mesh fabric for the netting to block even tiny mosquitoes. Hang the netting inside your tent, covering all openings. Seal any gaps to prevent bugs from entering. You can add a zipper or Velcro for easy access. Mosquito netting improves comfort and safety during warm nights outdoors.
Safety Tips
Safety is the top priority when making a hanging tent for camping. A secure setup protects you from falls and injuries. It also helps preserve the natural environment around your campsite. Follow these safety tips carefully to enjoy your hanging tent experience without risks.
Tree And Environment Considerations
Choose strong, healthy trees at least 8 inches wide. Avoid trees with dead branches or signs of disease. Check for loose bark or cracks that could weaken the tree’s support. Keep your setup away from fragile plants and wildlife habitats. This prevents damage to the environment and maintains natural balance.
Make sure the trees are spaced properly for your tent size. Avoid hanging your tent too high. Stay within a safe height to reduce injury risk if you fall. Inspect the ground below for rocks or sharp objects. Clear the area to create a safe landing zone.
Weight Limits And Load Distribution
Know your tent’s maximum weight capacity before setting up. Include the weight of people, gear, and accessories. Use strong ropes or straps designed to hold heavy loads. Distribute weight evenly across attachment points to avoid overloading one side.
Double-check knots and attachment points for security. Tighten all connections before entering the tent. Avoid sudden movements or jumping inside the tent. These actions can stress the ropes and cause failure.
Maintenance And Storage
Keeping your hanging tent in good condition extends its life and improves safety. Proper care helps avoid damage and keeps the fabric strong. Storing your tent correctly stops mold and mildew growth. Follow simple steps for cleaning and storing your tent after camping trips.
Cleaning Your Tent
Remove all dirt and debris before storing your tent. Use a soft brush or cloth to clean the fabric gently. Avoid harsh chemicals that can damage the material. Spot clean stains with mild soap and water. Rinse well to remove soap residue. Let your tent dry completely in a shaded area. Do not use direct sunlight or heat sources to dry it. Check zippers and seams for damage and clean them carefully.
Proper Storage Techniques
Store your tent in a cool, dry place away from sunlight. Avoid folding your tent tightly for long periods. Instead, loosely roll or fold it to prevent creases. Use a breathable storage bag or cotton sack, not plastic. Keep the tent off the ground to avoid moisture. Check the tent regularly for signs of mold or pests. Air it out before packing to keep it fresh and dry. Proper storage helps keep your hanging tent ready for your next adventure.
Enhancing Your Setup
Enhancing your hanging tent setup makes camping more enjoyable and cozy. Small changes can boost comfort and usability. Focus on lighting and weather adaptations to create a safe, pleasant space. These upgrades improve your outdoor experience and help you relax.
Lighting And Comfort Accessories
Use battery-powered lanterns or LED string lights inside the tent. They provide soft, even light without risk of fire. Clip lights to the tent’s frame or hang from the suspension ropes. Choose warm white bulbs to create a cozy atmosphere.
Add a soft, insulated sleeping pad or air mattress for better rest. Include a compact camping pillow to support your head and neck. Use a lightweight blanket or sleeping bag rated for the expected temperature. Small cushions or portable chairs can increase comfort when sitting.
Customizing For Different Weather
For rain, attach a waterproof rainfly over your hanging tent. Secure it tightly to keep water from dripping inside. Use extra tarps below as ground covers to prevent moisture from rising. In cold weather, add an insulated underquilt beneath the tent floor to keep heat inside.
In hot weather, open mesh panels to improve airflow and reduce sweat. Use a portable fan or battery-operated misting device to stay cool. Set up sunshades or tarps above your tent to block direct sunlight. Adjust your setup to stay dry and comfortable in any weather.

Credit: www.ezup.com
Conclusion
Making a hanging tent for camping offers a fun, unique outdoor experience. It keeps you off the ground, away from bugs and wet soil. You only need some basic materials and patience to build one. Remember to choose strong trees and secure your knots tightly.
With practice, setting up your hanging tent will become quicker and easier. Enjoy the comfort and adventure it brings on your next camping trip. Give it a try and see how it changes your outdoor stay.

I am an outdoor enthusiast and gear researcher passionate about camping, hiking, backpacking, and outdoor adventures. I enjoy testing gear, comparing products, and sharing practical advice to help readers make informed decisions. At BestOutsideGear, I create honest gear reviews, buying guides, and outdoor tips to help adventurers choose the right equipment with confidence.