How to Build a Tent Camper | Step-by-Step Guide for Beginners
Ready to hit the road with your own custom tent camper? Building one yourself might sound challenging, but it’s easier than you think—and incredibly rewarding.
Imagine having a cozy, lightweight camper tailored to your needs, ready for your next adventure. In this guide, you’ll discover simple, step-by-step instructions to build a tent camper from scratch, using affordable materials and straightforward techniques. Whether you want a small pop-up camper or a sturdy trailer, this article will help you turn your camping dreams into reality.
Keep reading, and you’ll be closer than ever to your perfect DIY camper!
Materials And Tools
Building a tent camper requires careful selection of materials and tools. These choices affect durability, weight, and ease of assembly. The right materials create a strong frame that supports the tent. Proper tools make construction faster and safer. This section covers key materials and essential tools to help you start your build.
Choosing The Right Frame Materials
Frame materials must be lightweight and strong. Aluminum is popular for its strength and rust resistance. Steel is heavier but very durable and affordable. Wood offers a natural look but needs treatment to resist weather. Consider how you will transport and store the camper. Choose materials that fit your needs and climate.
Essential Tools For Construction
Basic tools make building a tent camper easier. A drill with bits helps create holes for screws. A saw cuts wood or metal to size. Wrenches and screwdrivers tighten bolts and fasteners. Measuring tape and level ensure accuracy. Safety gear like gloves and goggles protects you during work. Gather these tools before starting your project.
Budget-friendly Material Options
Saving money is possible with budget materials. Recycled wood or metal can reduce costs. PVC pipes serve as lightweight frame parts. Canvas or tarp material works for the tent cover. Check local hardware stores or online for deals. Use leftover materials from other projects if possible. Quality materials are important, but budget options can still work well.
Design Planning
Design planning is the first step in building a tent camper. It sets the foundation for a camper that fits your needs. Planning helps you decide on the size, layout, and storage options. Taking time here saves problems later during construction.
Focus on how you will use the camper. Think about sleeping space, cooking area, and storage. Consider the materials and tools you have. A clear plan makes building easier and more fun.
Basic Tent Camper Layouts
Choose a layout that suits your camping style. Common layouts include a fold-out bed, a pop-up roof, or a simple box shape. Each layout offers different space and comfort levels. Keep the layout simple to start. Think about where you will sleep and store gear. Ensure enough room to move inside the camper.
Customizing Size And Features
Adjust the camper size to fit your vehicle and camping needs. Smaller campers are easier to tow and park. Larger campers offer more comfort and storage. Add features like windows, vents, or awnings. Plan for easy setup and takedown. Custom features improve your camping experience but keep them practical.
Incorporating Storage Solutions
Storage is key in a tent camper. Use built-in shelves, cabinets, or under-bed storage. Think about the gear you carry and organize accordingly. Use lightweight materials to avoid extra weight. Secure storage keeps items safe while driving. Plan storage that is easy to access and use.
Building The Frame
Building the frame is the crucial first step in creating your tent camper. It forms the strong skeleton that holds everything together. A sturdy frame ensures safety and durability on the road and at the campsite. Focus on precision and quality materials to build a reliable base. The frame includes the platform, side walls, and support beams. Each part must fit well and support the camper’s weight.
Constructing The Base Platform
Start by measuring and cutting the wood for the base platform. Use strong, weather-resistant wood like treated plywood or cedar. Secure the pieces with screws and metal brackets for added strength. Make sure the platform is level and square. This base will carry the camper’s weight, so it must be solid. Add cross supports beneath the platform to prevent bending.
Assembling The Side Walls
Build the side walls separately before attaching them to the base. Cut wood frames for each wall, keeping the height consistent. Include window and door openings as needed. Attach plywood panels to the frames with screws. Reinforce corners with metal brackets or wooden blocks. Make sure walls stand straight and fit perfectly on the platform.
Adding Support Beams
Support beams add strength and stability to the camper’s frame. Place vertical beams inside the walls at regular intervals. Use strong wood, like 2x4s, for these supports. Attach horizontal beams across the top of the walls to connect them. These beams help hold up the roof and tent structure. Double-check all connections to ensure a tight, sturdy frame.
Installing The Tent
Installing the tent on your camper is a key step in building a functional and comfortable shelter. This process involves choosing the right materials, securing the tent to the frame, and protecting it against weather. Proper installation ensures durability and ease of use on your travels.
Selecting Tent Fabric
Choose fabric that is strong and lightweight. Canvas and polyester are popular choices. Canvas offers durability and breathability. Polyester dries quickly and resists mold. Consider fabric with waterproof coating to keep moisture out. Color can affect heat absorption; lighter colors stay cooler.
Attaching Tent To Frame
Start by aligning the tent fabric with the camper frame. Use strong fasteners like snaps, zippers, or Velcro. Make sure the tent is tight but not overstretched. Secure all edges to prevent flapping in the wind. Check that doors and windows open easily without pulling.
Ensuring Weatherproofing
Seal all seams with waterproof tape or seam sealer. Add weatherstripping where the tent meets the frame. Use rain flaps over zippers and openings. Test for leaks by spraying water over the tent before use. Proper weatherproofing keeps you dry and comfortable in rain or wind.
Adding Functional Elements
Adding functional elements to your tent camper makes it more comfortable and practical. These features improve your camping experience by providing convenience and better usability. Focus on doors, windows, ventilation, and fold-out sections. Each element should be easy to use and durable for outdoor conditions.
Setting Up Doors And Windows
Doors and windows allow easy access and natural light inside the camper. Choose lightweight materials like canvas or mesh for windows. Install zippers or Velcro for quick opening and closing. Make sure doors fit snugly to keep bugs out. Position windows to catch the breeze and provide a view. Consider adding clear plastic panels for rain protection.
Installing Ventilation
Ventilation prevents moisture buildup and keeps air fresh inside the camper. Install vents near the roof or walls for proper airflow. Use mesh screens to stop insects from entering. Add adjustable flaps to control the amount of air coming in. A small fan can help circulate air during hot days. Good ventilation reduces condensation and improves comfort.
Creating Fold-out Sections
Fold-out sections expand the camper’s living space without adding weight. Design fold-out beds or seating areas for extra comfort. Use hinges and sturdy supports to keep sections stable. Choose materials that are easy to clean and weather-resistant. Ensure fold-out parts lock securely when in use and fold neatly for travel. These sections make your camper feel more spacious and versatile.

Credit: www.youtube.com
Finishing Touches
After assembling the main structure of your tent camper, it is time for the finishing touches. These final steps protect your camper and make it comfortable. They improve durability and add useful features. Focus on painting and sealing, adding insulation, and installing lighting and electrical. Each step enhances your camper’s usability and appearance.
Painting And Sealing
Painting your camper protects the wood and metal parts from weather damage. Use outdoor paint designed for durability. Apply at least two coats for better coverage. Sealing gaps and joints stops water from entering. Use waterproof sealant around windows and doors. This prevents leaks and keeps your camper dry.
Adding Insulation
Insulation keeps your camper warm in cold weather and cool in heat. Use foam board or spray foam for easy installation. Cut insulation to fit walls, roof, and floor spaces. Cover insulation with a protective layer like plywood or fabric. Proper insulation improves comfort and saves energy.
Installing Lighting And Electrical
Add lighting to make your camper usable at night. LED lights are energy-efficient and last long. Plan your light placement for the best coverage. Include interior lights and exterior porch lights. For power, install a simple 12-volt system or solar panels. Add outlets for charging devices and running small appliances.
Safety And Maintenance
Safety and maintenance are key to enjoying your tent camper fully. Keeping the camper stable and well cared for prevents accidents and costly repairs. Regular checks and proper storage extend its life and ensure comfort on every trip.
Stabilizing And Securing The Camper
Always park your tent camper on flat, firm ground. Use wheel chocks to stop any movement. Lower the stabilizer jacks at each corner to keep the camper steady. Check that all support arms and locks are tight before use. Secure the tent fabric well to avoid flapping in the wind. Proper setup prevents damage and keeps everyone safe inside.
Routine Maintenance Tips
Inspect the camper regularly for tears or holes in the tent material. Clean the fabric with mild soap and water to prevent mold. Check the frame for rust or loose bolts and tighten them. Grease moving parts to keep them working smoothly. Test the brakes and lights before each trip. Small fixes now avoid big problems later.
Storage And Transport Advice
Store your tent camper in a dry, shaded place to protect it from weather damage. Cover it with a breathable tarp to keep dust and moisture out. When towing, secure all loose parts and close the tent fully. Drive carefully to avoid bumps that could harm the camper. Proper storage and transport help your camper last longer and stay ready to use.
Budget Tips
Building a tent camper on a budget is achievable with smart planning. Saving money does not mean cutting corners on quality. Careful choices in materials and methods can keep costs low. Focus on affordable sources, balance DIY and store-bought parts, and use cost-efficient building techniques. These tips help you create a reliable camper without overspending.
Sourcing Affordable Materials
Look for materials at local hardware stores during sales. Check online marketplaces for secondhand parts in good condition. Recycled wood and metal can be cheaper and strong enough. Avoid expensive brand names; generic products often work well. Buy only what you need to reduce waste and extra costs.
Diy Vs Purchased Components
Making some parts yourself saves money and adds personal touch. Simple items like shelves or storage boxes are easy to build. Complex parts such as tent fabric or hinges are better bought. Use ready-made components that ensure safety and durability. Balance your skills with purchased items for a smooth build.
Cost-saving Building Techniques
Use basic tools you already own to avoid rentals. Plan the layout carefully to reduce material cuts and waste. Choose lightweight materials to ease the build and reduce trailer strain. Apply simple joinery methods like screws and brackets instead of welding. Work in stages to spread costs over time.
Useful Resources
Building a tent camper can feel like a big task. Useful resources make the process easier and more enjoyable. These resources provide clear instructions, helpful tips, and support from others who have built campers. This section shares some of the best tools to guide you through your camper build.
Diy Plans And Blueprints
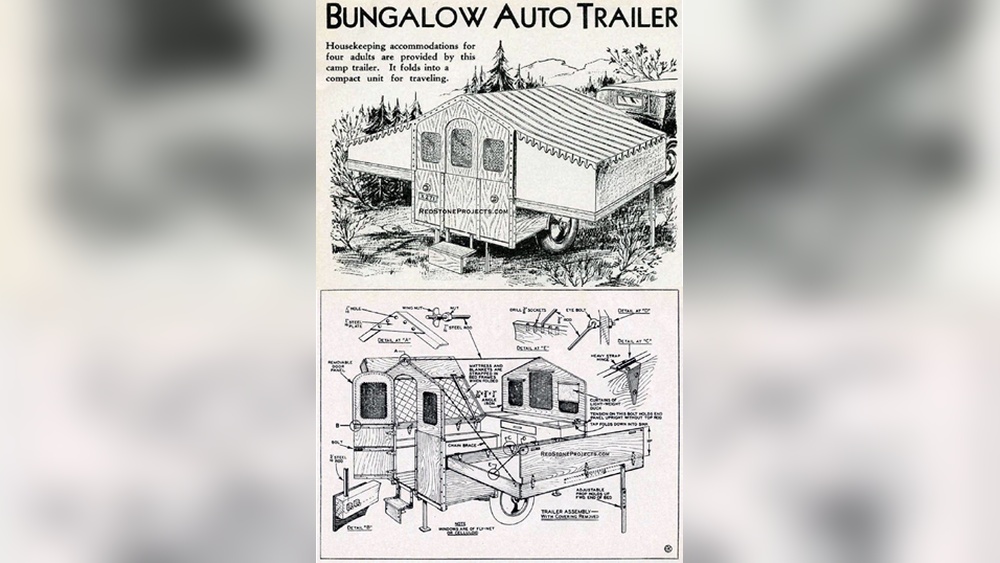
Starting with detailed DIY plans helps avoid costly mistakes. Blueprints show exact measurements and material lists. They guide you step-by-step through the build. Many plans are customizable to fit your needs. You can find free and paid plans online. These help beginners and experienced builders alike.
Online Tutorials And Videos
Videos show real-time building processes in simple steps. Watching tutorials helps you understand tricky parts better. Many creators share full camper builds, from frame to finish. You can pause and replay videos as you work. This visual aid makes learning faster and clearer. Sites like YouTube have thousands of camper build videos.
Community Forums And Support
Forums connect you with people who share your camper goals. Members exchange advice, answer questions, and share experiences. You can find solutions to common problems fast. These communities encourage beginners and celebrate successes. Joining a forum builds confidence and keeps motivation high. Popular forums include Reddit’s camper building groups and specialized camping sites.

Credit: www.egg-co.at

Credit: redstoneprojects.com
Conclusion
Building a tent camper takes patience and careful planning. Use simple materials and follow clear steps. Customize your camper to fit your needs and budget. Enjoy the satisfaction of camping in your own creation. Start small, learn as you go, and keep improving.
Your tent camper will bring many fun adventures. Keep safety and comfort in mind during every build. This project makes outdoor trips more enjoyable and personal.

I am an outdoor enthusiast and gear researcher passionate about camping, hiking, backpacking, and outdoor adventures. I enjoy testing gear, comparing products, and sharing practical advice to help readers make informed decisions. At BestOutsideGear, I create honest gear reviews, buying guides, and outdoor tips to help adventurers choose the right equipment with confidence.